Cruising the grocery store isles, I frequently see shelves loaded with bags and boxes of countless types of pasta. An interested shopper could spend half an hour perusing the options. Even someone with less than a dollar can find something as long as they had a few pennies to pay the tax. Pasta is cheap.
The cheap pasta, however, can be doughy and easily overcooks, resulting in an insipid, squishy mess that is only fit for the dog's dish or the compost bucket.
Higher quality pastas are a terrific choice, but can be expensive, with a high carbon footprint- most having been transported from Italy, where all pastas originated hundreds of years ago. Thankfully, there is another way.
Make your own.
I can hear the collective gasps. I know. It's a bit of a chore, admittedly. But if you are organized and committed, you can produce pounds of high quality, nutritional noodles with 0 carbon footprint, that will provide your family with many, many meals.
Step one: Clean.
Yes yes: they never clean on the Food Network. Remember- Food Network is a wealthy behemoth with countless eager minions behind the scenes scrubbing and sanitizing. Even if you don't see the cleaning, you can be sure it is happening. Making pasta will put you -and the pasta- into close contact with nearly every horizontal surface in your kitchen, so unless you want dog hair and dead fruit flies in your dinner, wipe down and scrub everything.
Step two: Make friends with your pasta machine.
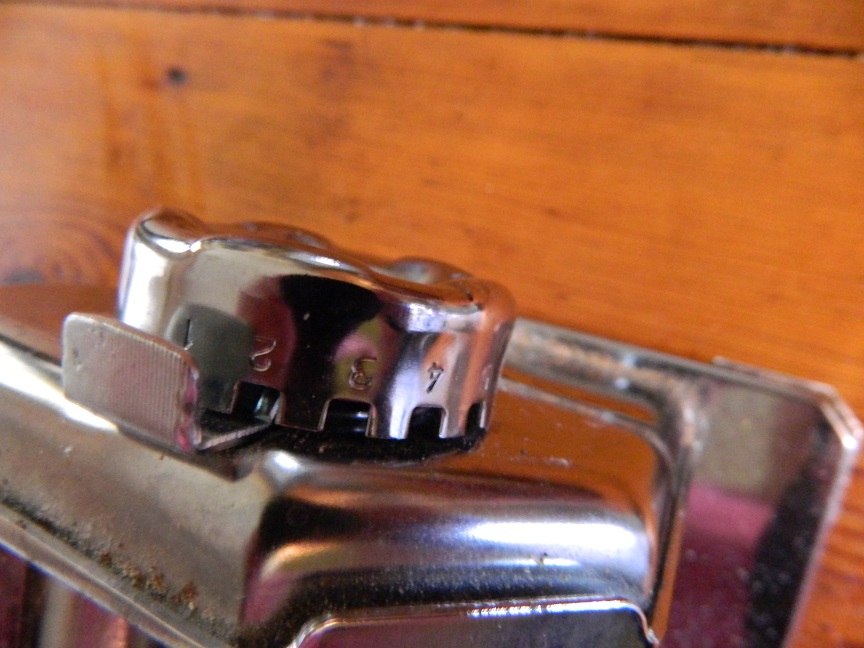 |
| This dial controls roller widths |
rolled in the beginning on the widest space between the rollers, and gradually cranked down to the narrowest gap, resulting in thin, delicate noodles.
Step Three: Prepare your kitchen.
Making pasta is much more fun when everything is laid out ahead of time. Set out a sheet pan covered with clean tea towels dusted with flour along with a container of "bench flour" for dusting worktops. Also, decide how you are going to dry your pasta. My kitchen, which is a refugee from 1934, has very little countertop space. So I choose to hang my pasta to dry it. I have a wooden drying rack in my shed where I dry everything from pantyhose to garlic. If you don't have a drying rack, you can use clothing hangers hung from doortops, backs of chairs, or edges of tables. Those with abundant counter real estate can pile their noodles into loose piles, or "nests", a handful of pasta in each nest. Just lay clean tea towels dusted with flour onto your work surfaces and drop your nests there to dry. Unless you live in the desert, you'll need to allow 24 hours to dry any pasta thoroughly.
Step Four: Clear your schedule.
To enjoy the process of making your own delicious pasta, try to carve out at least 3 hours to complete the job. I find that when I am distracted and pulled away frequently, I just end up fractured and annoyed. Making your own quality food is your right. Own it. Give it the time it needs.
Step Five: Make your dough.
Several years ago, I read an article about a far northern Italian village. The residents of this Alpine
 hamlet were great pasta makers and all used roughly the same recipe: 1 kilo of flour and 10 eggs. That's it. For those with no kitchen scale, one kilo= 4.3 cups of flour. (I used 12 eggs because they were from my sister-in-law's little Banty hens, who produce tiny little eggs.) Mix the flour and eggs together and knead into a ball of dough. Most traditional pasta methods call for the maker to dump the flour on the table, hollow out a well in the center of the pile and pour the eggs in. Working from the outside, pull in gradually increasing amounts of flour until a sticky wad of egg and flour is produced. Knead this wad until it "comes together" and is smooth and homogenous. I, however (as many of you know) am a rebel. I like to do things my own way. So I make the dough in my 5 quart Kitchen Aid mixer using my dough hook. Once the dough is initially formed, you must finish kneading by hand or you will burn out your motor; the dough is very dense!
 One small note: it is very helpful to invest in a small kitchen digital scale. One that has at least a 7 pound capacity will run you between $30.00-$80.00. Once you start to do more home cooking and baking, you will find more recipes written in scaled amounts. It's more accurate and when you adjust to the method, it's much, much easier!


Wrap the resulting ball in plastic and refrigerate for at least 30 minutes. Use the dough within a day or two. If you let it rest for too long it will turn an unpleasant shade of green. (Still safe to eat, but not as delightfully yellow)
Step Six: Roll the dough.
 Remove the dough from the fridge and whack off a piece. Dust it with flour and pat it down as thin as you can, about 3/8", so the rollers have something to grab onto. Roll it several times through the largest setting, folding the dough once or twice. The dough will become smooth and elastic. Run the dough through
 each setting until you get to the thinnest setting. Lay it out on your prepared tray and dust it lightly with flour. Repeat these steps until you have either worked your way through the dough, or have made as much pasta as you like.
 |
| Fold over every so often |
Step Seven: Cut the pasta.
 Allow the sheets of rolled dough to dry for 10 minutes or so, until they feel like fruit leather. Roll the ends towards each other. Slice the roll across in the widths you desire. I made Tagliatelle today, which
  |
| Roll the ends towards each other |
Once you have cut the noodles, slip a long knife underneath and lift up. The noodles will fall over the knife and you only have to drape them onto their hanging rods.
 |
| Slide the knife under the center and lift. The noodles will fall |
This kind of pasta is delicate, so use care removing the dried noodles. Store in whatever clean bags
you have either in your pantry, or freezer. If you break, drop or otherwise shatter your pasta, fear not. Store those bits in a separate container and use them in soups and stews!
Not only does making your own pasta benefit your family's nutrition, it's also cheap! I made at least 4 meals worth of noodles for .50 worth of flour, and the eggs were free. So that's less than .15 per meal for the starch portion of your menu. That's pennies per serving.

 Personally, I think it's worth the time and effort. Involve the kids or your friends. Open some wine and cook some of the pasta fresh along with some grilled chicken and seasonal veggies. Make a party of it and celebrate your new skills!