Monday, June 10, 2013

BakingLove: Ciabatta

To me, bread is life.

Any kind of bread.

Bread with good cheese, some fresh seasonal fruit and wine is one of my all-time favorite meals. Steamy fresh bread hot out of the oven, lightly spread with butter is simple- and heavenly. Stale bread makes the list too: cubed and tossed with tomatoes, onions, basil and vinaigrette is the base of Panzanella, the delicious Italian summer-time salad.

All countries have their cultural breads. Ireland has soda bread. Middle Eastern countries have lavash and pita bread. There is skolbrod and kneip in Norway and oatmeal bannocks from Scotland. The ubiquitous French baguette is one of France's most popular exports- dominating many other European breads. Italy took umbrage with their neighbor's bread success, however. The Italian answer to the popularity of baguettes is Ciabatta. Italian for "slipper" or "old shoe", ciabatta is a relative new-comer to global cultural breads, officially created in the mid 1980's.

Ciabatta is simple to make. Not quite as easy as French bread, but close. There are 5 ingredients: flour, salt, olive oil, water and starter. A starter is just flour and water mixed together in a container, covered
and left in the fridge for at least 24 hours. A starter can also be called a pre-ferment, poolish, biga, sponge, or levain. Differences are cultural and refer to wheat/water ratios. Back-breaking texts have been written on this subject, so suffice to know that the information is available if further study is desired.

Perhaps the most complicated part of making your own ciabatta is planning ahead. Yeast is optional. The beauty of using a starter in bread formulas is that the starter - even in the fridge- gathers natural yeast that is always present in the air around us. If you are in a hurry to produce a loaf, you can add a teaspoon or so to your batch to speed up the fermentation. If you choose to forgo the yeast in favor of a real natural yeast fermentation, you'll need most of the day to get your first rise.

When I am making bread at home, I almost never use a recipe. I've been making bread for over 20 years, and in the beginning I never deviated from the instructions. Once I began to really listen to the bread, and understand what it was saying, I only used a recipe when making large quantities of bread that I was being paid to make and was expected to be able to sell!
The only equipment you need is a bowl and a mixing spoon. Jewelery and watches should be removed and you should make friends with your naked hands. I use my 5 quart Pro-series Kitchen Aid mixer (the undisputed king of my kitchen), fitted with a dough hook to save time and limit messy clean-up.

Here is the "recipe" I used today, as close as I can relate when I am dumping ingredients into the bowl based on what the bread tells me. (My fellow professional bakers and pastry chefs are agog now, I'm sure. All in fun, folks!)

Winter'rest Farm Ciabatta
6 cups starter
3/4 cup EVOO
4 cups quality bread flour
1 1/2 TBSP salt
warm water as needed

Combine starter, flour and oil. Mix to incorporate. Add salt. (Note: salt can kill yeast, so I add it after the flour and other ingredients are blended. This seems to protect the yeast from the heavy
These "rags" tell you the formula has a good water/flour ratio
concentration of salt when it is added, before it is spread around the batch and loses it's potency. Also, add the salt before you add any water. Salt tightens the gluten and can render water unnecessary in some cases)
Add water if the batch is dry, a touch at a time. If the mix is wet, add a bit of flour at a time until the formula can be handled easily. (These are small batches of home-made bread. I would always use a tested recipe for larger batches or bread I was marketing- to maintain consistency)
Knead on the machine or by hand for 15-17 minutes. This sort of bread can be loose and sloppy. Don't let that worry you. It will come out fine!
Cover and place in a warm, draft-free place. My oven has a "Proof" setting. As long as the temperature of your proofing area is under 140 degrees, it will work. All yeast is killed at 140 degrees.
Once the dough has doubled in size, dump it onto a floured surface and pat into a rectangular shape.


Fold the dough envelope style,
 gather and flip onto a prepared sheet pan. Flip it so the underside that was on the floured surface is now facing up. Flour is the "garnish" for ciabatta, so dust the top lightly with flour.
Gather the "envelope"
Set aside to rise for 1-2 hours- but LISTEN to what the bread tells you. Some breads take more or less time time to complete this second rise. If it looks like it is rising quickly, get it into a 400 degree oven sooner. Bread that over-rises can deflate and collapse. Under-proofing can cause the bread to stretch and pop in undesired areas.


Don't be afraid!
Remove to prepared sheet pan


Flop over so the bottom is now on the top


Dust with flour and allow your ciabatta to rise a second time
At the end of the day, whether your ciabatta is under-proofed or flat from over-proofing, you will still have an edible hunk of bread that you made yourself. More than likely you will have a big, beautiful loaf of ciabatta that will feed you for most of the week, as long as you keep it bagged or wrapped in plastic to keep the air from staling it. Even after it stales, though, toast it and use it in recipes that call for toast, or whiz it in your food processor to make your own bread crumbs. If you don't think you'll eat the whole loaf in one week, cut it in half and freeze part of it. Bread freezes very well, as long as it's wrapped and not left more than 30 days or so.
Just have fun experimenting with bread. Fat or flat, round, square or buns, bread is good any time. Just no margarine, please!

Saturday, June 8, 2013

Living Local and Loving it!


As a child, my parents exposed my sister and I to lots of British television and movies.  Although there were some exceptions, most of the shows and movies were set in some idyllic village; a cluster of thatched or tiled-roof cottages set cheek-by-jowl around a meadow, green or garden- usually sporting a charming bandstand or summerhouse. The denizens of the featured hamlet shopped daily with their bicycles, baskets and trollies at the village green-grocer and made routine appearances at the local pub. The rosy-cheeked children would ride their ponies and horses through the relatively car-free lanes and walk to the tiny village school- returning home for lunch to waiting Mums with steamy plates of cheese and fresh bread and frothy cups of local, creamy milk. Daily life was studded with Fetes and Festivals, during which the village was transformed by fluttering flags, streamers, balloons and groups of musicians in traditional garb playing old-time tunes.

Really? Is that sort of lifestyle really possible? Or is it just scripted for the cameras?

Sigh.

I grew up and faded into young adulthood secretly chasing that subconscious wish for a life set in an English village; a slow pace- walking out of the house, pushing the baby carriage (leaving the top of the arched Dutch-door open, of course), through the wee garden gate and down the lane to the grocer's shop. Waving to passing villagers and stopping to admire the flowers that border the village green.

I had it all laid out in my mind.

But twenty-something years later, I was still driving everywhere in my car, rushing about to "get things done" and "stay on top" of the latest fads and wishes that would wash in waves through my suburban existence. I raced around on endless highways with my SUV loaded with huge economy-sized bales of paper towels, canned goods and plastic wrapped meats in their styrofoam trays sitting atop blood-absorbing "diapers". All to get the best! Lowest! Family-sized! Price! Ugh.

Then one day, suddenly...it was too much. I just couldn't do it any more.

I began to formulate a plan to return to my dream of living a slower, more peaceful, higher-quality style of life- preferably in a quiet village somewhere. Through research, I found that English village life was indeed a reality and not just scripted for the cameras. I dove into my search for an American village that would meet at least some of my ideals and wishes. Finally, on my 40th birthday- an early September day that was a remarkable 107 steamy degrees, I threw a dart at the map- in the form of Google- and found Newport, New York.

My husband and I bought acreage in Newport and began to develop our own small farm that we call Winter'rest Farm. We found a tiny house in a neighboring village and moved there from North Carolina in the summer of 2012. (See previous post "The Gift of an Old Girl")
Newport Marketplace features a full rack of Bob's Red Mill products!
There are still highways to travel, and I still have an SUV. But the pace and quality of life here is perfect for us and our children. Villages in the Kuyahoora Valley- where Newport is nestled-  are surrounded by farms of all kinds; farmer's markets abound and villagers support local businesses and tend to stay local if possible. Folks on horses clip-clop by the house every so often, and the clatter and rumble of Amish buggies is a routine occurrence. Children- and adults- ride their bikes everywhere and several folks use their lawn tractors to ride down the street to visit neighbors. Even the climate in Newport is similar to English weather!

As I began to explore the area, I found businesses that I really liked and wanted to support. One of those is Newport Marketplace. Opened just a few years ago, owners Dick and Patty Marko bring wonderful, local and small-producers products to their store shelves. They believe in local and seasonal sourcing and are even establishing their own farm - Hill Side Meadows Farm- to help supply their customers.
Newport Marketplace carries products that are old-fashioned and delightful. They feature high-quality healthful items like coconut oil and ground flax seed.
A bright, shiny wall of cold-storage shelves are stocked with local dairy producer Stoltzfus Family products. There is Amish butter and plastic bags of creamy and delicious cheese curds. Patty stocks her own free-range eggs which are right next to the cheeses of another local business: Three Villages Cheese Co.

River Rat Cheese Co. 4 year sharp cheddar, cut as much as you like!
There are big, clear bags of oats and flour. There is dried fruit, vanilla and local honey. Jugs of local maple syrup and muslin bags of corn meal crowd loaded shelves, alongside little zip-lock bags of spices and other delightful culinary bits-and-bobs.

Next to the check-out counter is a tall stand with a checkerboard adorning the top. Crowning the surface of the game-board is a giant block of 4-year sharp cheddar, produced by River Rat Cheese Co. in Clayton, NY- a couple of counties north of Newport. Patty keeps a big chef's knife next to the lump of cheese; just hack off as much as you like!


Piles of delicious bacon and sausages!
Behind the River Rat Cheese is a low glass freezer chock-full of bacon and sausage supplied by local Mennonite farmers. Bags are simply labeled with the item name, weight and price. The meats are in clear plastic bags so that customers can see what they need to see: the product!


Everyone needs some gummy fried eggs!!
 Newport Marketplace is not just a grocery store. There are antiques and architectural salvage, decor, handmade items and art. It's a real gem of a business wedged between Highway 28 and the West Canada Creek.

On this day, I left with my paper grocery sack full of oatmeal, ground flax seed, vanilla, craisins, cheese curds, honey and sausage links. I am thrilled that there is a business like this just 4 minutes from my house. The Markos are part of a thriving village life that makes it possible for those of us who have transplanted themselves willingly, in order to benefit from what this valley has to offer.


The Kuyahoora Valley is just one of many American small towns, villages and hamlets.  There are many ways to live in this great country and this is the way we have chosen: living local and loving it!

Bragg's organic apple cider right next to local producer Ford's Honey


Friday, June 7, 2013

BreakfastLove: Granola


It could not be easier to make your own breakfast cereal. Granola in particular is very simple. In fact, the hardest part of making granola is shopping for, and deciding on what you'd like to include!

Today I am staying simple. These are all whole ingredients. Although they are packaged for the store shelf, the only ingredient in the container is what the label says on the front: oats, flax seed, honey, craisins, olive oil, walnuts, cinnamon, nutmeg.

That's it.

4-5 cups "old fashioned" rolled oats
1 1/2 cup local, American honey
1/2 cup extra virgin olive oil
1 cup ground flax seed
2 tsp ground cinnamon
dash nutmeg
1/2- 1 cup craisins, or other dried fruit
as many kinds of nuts you'd like (nut oils are WONDERFUL for you!)

Simply combine those ingredients in a bowl, toss thoroughly to mix and spread on a baking sheet.
Bake at 325 for 30 minutes. Remove from the oven and let cool. Toss lightly to break it up. Return to oven for another 30 minutes. Remove from the oven and let cool.
Store in an airtight container on your pantry shelf.

So you've just made yourself roughly 2 weeks worth of your own breakfast cereal. The quantity used in this recipe cost about $4.50-$5.00 in ingredients. You can make any kind of granola; throw in coconut, peanut butter, chocolate chips (after baking), whatever you like. Instead of local honey, try local maple syrup, sorgum or molasses. Be creative! Make your own labels! Just DO IT!

Those of you with children will find this a fun, simple, low-mess project to do with the kids. Making your own granola fills your house with all the cookie-good smells without the caloric temptation. You still have time tonight to make your family a healthy breakfast!


Thursday, June 6, 2013

FoodLove: 30 days- No processed foods!


I don't know what makes me do the things I do. Too many brain cells with too much time on their hands? I'm not sure. Maybe it's just plain old passion combined with the perspective of 46 years of observation.
I was also raised in Oregon in the 70's by a mother who wholeheartedly embraced the food movements of the time. There was no chocolate in our house, only carob. She scavenged our woods for Oregon grape and made jam and preserves out of them. Friends spending the night were out of luck if they looked for boxed cereals in the morning; there was only her home-made granola. In her spare time, she hauled old metal ship's cabinets from Zidell Yards in Portland to make durable kid furniture. She cleaned them and painted them bright colors for me and my sister Lynn.

So thinking back, maybe I shouldn't wonder too deeply about where my bright ideas come from!

I am grown now; a wife, mother and Chef. I am passionate about food, growing food and showing my children and others how food can improve our lives. I've observed how Americans have waged war on themselves using food as a weapon...and it has hurt. I have always been convinced that America's obesity-related disease problems could be traced back to food (and sometimes lifestyle) choices. As a nation, we work out to the point of dropping, choose fat-free, boneless/skinless/flavorless food products from grocery store shelves, and undergo life-threatening surgeries- all to maintain a certain number on a weight scale or a certain clothing size. But we continue to have health problems; weight yoyo-ing up and down as we react to whatever number our scale, or our doctor shows us. This doesn't even take into account the mental component; scores of Americans miserable with the way they feel and look-and guilty about it to boot!

I am certainly not one to throw stones when it comes to weight. According to the official charts and graphs, I've always been 10 or 15 pounds overweight for my height. I survived an awful eating disorder in college, ending up in the hospital and attempting to become addicted to cigarettes (you know like the models do) to stay thin. At some point about 15 years ago, I thanked my healthy genes which resisted these addictive behaviors and decided to just live my life, enjoy my husband and healthy children- and eat what I liked in moderation - much like all of our fore-bearers did.

I went to culinary school and began to learn from real experts about classic food as well as the recipes and foods of other cultures. I became interested in nutrition and agriculture. I read articles about "Blue zones"- areas of the world where people live immeasurably longer than other areas; places like Okinawa, Japan, Sardinia Italy, some areas in Greece, Costa Rica and Loma Linda, California. Blue zone poplulations have many things in common: no smoking, plant-based diets, family-centered lifestyles, constant moderate activities like agriculture and fishing as well as a high intake of legumes.

Although I can not be considered an expert, it is my belief that most of America's health problems lead back to diet and high stress lifestyles. Some of this has it's root in poverty (incredible in the world's "richest" country). For instance, margarine is one molecule short of being plastic, but yet people buy it because it's cheap. They also have the mistaken idea that since it contains no cholesterol, it is a healthier choice. Look back to times before WWII, times before margarine...a time when people ate all foods in balance, in accordance with their income and ability. Those same fore-bearers also lived a slower pace of life and ate more locally.  Most of my ancestors lived into their 80's and 90's. Yes, they still had social and nutritional problems, but it makes you think, doesn't it?

I could wax on for longer than anyone wants to read. Suffice to say that I thought it would be interesting to try a 30-day commitment to only whole, unprocessed food and see if it could be done from a logistic and financial standpoint. Wikipedia defines processed food as "Food processing typically takes clean, harvested crops or butchered animal products and uses these to produce attractive, marketable and often long shelf-life food products."  Also, anything that is boxed, canned or bagged. For the purpose of my crazy experiment, I will include products like canned whole vegetables, oats, pasta, rice, jams, jellies and preserves, pickles as well as fermented products like sauerkraut in the "whole food" category. Spices, baking soda, powder and other dry goods are going to be considered "whole food" as well.
Part of this challenge too, I think, is the ability to put together meals out of what is on hand. So instead of creating meals from a recipe, create the recipe from what you already have. 

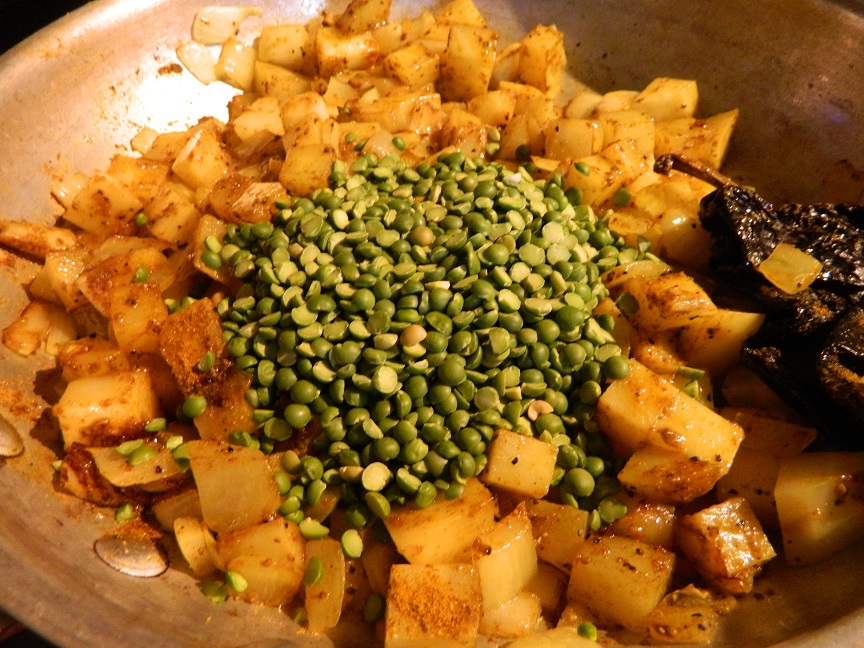
I had a bag of split peas languishing on the shelf and I just couldn't face a bowl of split pea soup. So, here is today's recipe:

Green split pea and potato in the Dal style


(Keep in mind, the beauty of Indian cooking is the ability to put what you like in and control the flavors yourself. If you don't have something listed here, substitute similar items out of what you have on hand)

1 16 oz bag split peas
2 large peeled potatoes, small cubes
1 tbsp curry powder
2 tsp cumin powder
grated fresh ginger
juice from 2 lemons or limes
1 large onion, chopped
3 grated garlic cloves
1 dried poblano pepper
1/4 cup EVOO
4-5 cups water
Salt and pepper to taste
cilantro

Heat the EVOO in a skillet. Throw in the onion, dried pepper and spices, stir to coat and caramelize. Add the potatoes. Continue to caramelize. After several minutes, add the split peas and extra EVOO if needed. Saute lightly. Add the water in 2 cup increments; then add the garlic. Continue to add water until the peas no longer absorb it. Reduce heat to low and simmer for 30-40 minutes or until peas and potatoes are tender, but not mush. Remove from heat and top with cilantro. ( I love cilantro, but if you are a member of the opposite camp, just leave it out)
Had to leave coconut milk out! PRESERVATIVES!!


I started my day with oatmeal, honey and walnuts. I was still hungry so I added a banana. It's important to note as well, that I don't often eat "3 squares". I eat when I'm hungry. I must provide scheduled meals for my family, but I don't always partake. So I will not always post 3 meal options each day. It will be a true representation of my Whole Food Day!


It's going to a little bit difficult for me, I think. My favorite food group is Cheetohs.

I'd be happy if you went with me on this experiment and see where it takes us!


I added a piece of Swai fish (definitely not local) and some lemon thyme to make my meal!


Tuesday, June 4, 2013

DinnerLove: Corn Chowder dumplings


I love leftovers.

Some folks think leftovers aren't fit to feed to the dogs. But to me, leftovers are a way to stretch your food dollars. And many dishes taste better after an overnight sit. (In the fridge, of course.)

When I am uninspired with my fresher options, I mine my refrigerator for bits and pieces that I combine to make one main dish or a side dish for my family's meals.
Today was no exception. Crammed next to the egg carton was a half-empty bowl of mashed potatoes, it's cellophane covering sliding down around the bottom of the bowl, condensation dripping off to puddle on the glass fridge shelf. Shameful.

I pulled that out and set it aside. My first thought was gnocchi. I've done a post on how to make that. So I pulled out the eggs that were jammed next to the shameful potato bowl. Behind the egg carton was a little surprise; a bowl of leftover corn with no cover at all and the serving spool dangling off the edge. Jeeze. Here I am supposed to be a culinary professional.(LOL) Shameful.

So I pulled that out and peered back into the refrigerator to make sure there were no other sanitation violations. Relieved to see all was clean and covered, I turned to the items on the table behind me. Sighing, I dumped the mashed potatoes into my 5 quart mixing bowl, added a few spoons of the corn (the rest went into the compost bin) along with 4 eggs and about 2 cups of all-purpose flour. I flung the bowl onto the machine and gave it a whir. I threw the resulting mixture in it's bowl into the fridge to rest for the day.

Simmer for 15-20 minutes
To finish these shameful dumplings, I use a cookie scoop and drop them into boiling water. I prefer to toss them in browned butter before serving, or even add some grated parmesan cheese, but you can use any sort of sauce you like.

Heat butter til it browns


Then again, you can always leave your hot dumplings naked. After all, they are shameful!


Monday, June 3, 2013

SnackLove: Whole Wheat Cocoa Brownies!


It was a cold morning. I had nothing planned. The house was clean, the garden was planted and mulched. Laundry had been folded an put away. The big yellow bus had swept the kids off to school.

The dogs were snoring in their beds.

With our new, simpler lifestyle, we had forgone the satellite dish and cable service in favor of other more important things- like farm infrastructure, not to mention paint, wallboard, lumber, nails, wire, plumbing and scads of nuts, bolts, gaskets, fittings and tape- all to bring Appleside Cottage back to her formal glory.

There was just no extra money for 600 of America's favorite channels.

That cold morning, the 2 channels our antennae picked up were not offering anything more insightful than the latest Hollywood fluff or what insipid shade of eyeshadow everyone-who-was-anyone would be buying and wearing for the upcoming season. So, as often happens, my attention was drawn to the kitchen.

Since it was a chilly morning, my thoughts went automatically to baking. As I perused my pantry to see what the pickings were, I was disappointed. Unless I wanted to make a sweet whole wheat omelet filled with walnuts and shredded coconut, I was out of luck. Then suddenly, out of the corner of my eye I spotted the glint of white in the letter "H" that formed the word Hershey's! COCOA!

Even with the momentary thrill of finding a brand-new can of cocoa powder, I was chagrined; my dry-goods shelf was pretty bare. It took about 4 seconds to take inventory: a half a bag of 10X sugar, 2 empty bread bags I was saving to store my home-made bread in, a comfortingly full bag of walnuts, a container of self-rising flour (nearly useless unless you are making biscuits every day), 1 scant cup of all-purpose flour and sturdy brown bag of King Arthur whole wheat flour.

So I channeled my old pal Pooh-Bear. "Think think think!"

Here is the result:

Winter'rest Farm Whole Wheat Cocoa Brownies

1 stick butter (or 1/2 stick butter, 1/2 cup applesauce)
1 1/2 cup sugar
1 cup cocoa powder
pinch of salt
1 tsp vanilla extract
3 eggs
1/2 cup whole wheat flour
Optional: add-ins like chocolate/butterscotch/peanut butter chips, nuts, or coconut.

Preheat your oven to 325. (With a few exceptions, most baked goods perform better at a lower temperature. So if in doubt, use 325 degrees)Melt the butter, sugar, cocoa powder and salt in a pan on low-medium until combined and smooth.Remove and cool.
Note: it is helpful to put the butter in the pan first, then the sugar, then the cocoa. If you get sugar lumps, bump up the heat, stirring constantly, then turn the burner off and let the pot stay on the eye, using the residual heat to continue to melt down the sugar. If a large lump develops and resists melting, just remove it.
Once the chocolate mixture is cool, add the vanilla and eggs, mix until well incorporated. Add flour and mix. Pour into a pan prepared with pan spray and parchment (or just buttered). Bake for 20 minutes or until a skewer inserted comes out clean.

Now, I won't go so far as to say that these brownies are healthy. But when you have a chance to throw in some element that provides just a bit more nutrition, why not? Just don't tell them it's made with whole grain flour. I doubt anyone will be able to tell!


Friday, May 31, 2013

FoodLove: Rhubarb

Looking at my freshly washed spring rhubarb, it's hard to believe that this humble plant -classified surprisingly as a fruit in America- was once more highly prized than cinnamon and opium when it traveled the Silk Road to 14th century Europe.
For thousands of years, rhubarb could be found to be growing wild on the banks of the River Volga, which flows through central Russia. The plant finally made it's way to America in the 1820's, and began it's popularity along the east coast and spread west from there.

Now that I live in a cooler, more temperate climate, I find that everyone has at least one huge clump of rhubarb in their back yard. Although rhubarb can be grown in almost any region, it grows best in areas with lots of rain and what is called a "chilling requirement"; a certain number of nights in the 40s or below during the growing season. In upstate New York, we plant rhubarb in direct sunlight, and our rainfall is sufficient to render irrigation unnecessary. If one wants to grow rhubarb in hotter climates, it would need to be planted in a shady spot and provided with lots of water.

Many grocery stores carry greenhouse-grown rhubarb, which typically presents a stronger pink or red color to the stalk and can be sweeter and less tart than outdoor-grown rhubarb, which tends to show a much more mild pink and can sometimes even be a simple pale green. The color of the stalk bears no effect on it's culinary suitability - other than a slight difference in the sweetness.

This year, following a marathon spring planting day, I came home to find a bag of rhubarb stalks hanging on my front door knob- a gift from my lovely next-door neighbor. Having lived in the Southeast for close to 30 years, I hadn't had a lot of exposure to rhubarb or it's recipes. The day I snatched that bag of leggy, lolling stalks off my front door, started me on a path of new and exciting culinary possibilities. I started with rhubarb cobbler:

Preheat your oven to 400 convection. (425 non-convect)
1 cup white sugar
6 cups rhubarb, cut to large chunks
3 heaping TBSP cornstarch
splash of water
Mix the sugar and cornstarch together in a large saucepan. Add the rhubarb and toss to coat. Add a splash of water and bring the heat up to medium. Cook for several minutes to develop the starch and slightly cook the rhubarb. Set aside.

1 cup all-purpose flour
1/4 cup white sugar
2 tsp baking powder
pinch of salt
1/2 stick of butter
1/2 cup milk
2 eggs

The cake part of a cobbler is what is known as a "quickbread". Quick breads are mixed using a technique called "wet-dry" mixing.  Combine the dry ingredients and mix. Melt the butter, lightly scramble the eggs and add both to the milk. Mix to combine. This is your "wet" component. Add the wet to the dry ingredients and mix together, but don't overmix.


Remove the rhubarb mixture to a 9x13 pan or other suitable baking dish. Dot the top (if desired) with dabs of butter. Pour the batter over the top and bake at 400 for 25-30 minutes or when the top is golden brown and the fruit is bubbling up from underneath. It's a good idea to bake cobblers with an underpan to catch possible drips.

Finished cobbler. Serve with vanilla ice cream!
Another good recipe using rhubarb is Rhubarb Bread. Much like banana bread or zucchini bread, the batter is heavy and can taste a little like cake. My recipe was invented on a morning when I had 7 young adults (including 4 strapping West Point Cadets) to feed, 4 eggs, one stick of butter, 25 pounds of sugar (to feed to the new bees), a half-empty jar of crystallized honey, and a sink full of rhubarb that I had gotten from the neighbor's giant patch. (with permission, of course). I did have some steak sauce, peanut butter, yellow mustard and a can of Italian Sardines, but I couldn't come up with a passable idea that would appeal at 9 am.

Winter'rest Farm Rhubarb Bread
1 stick of butter
2 scant cups white sugar
1/2 cup local honey
4 small eggs or 3 large/extra-large eggs
1 3/4 cup all purpose flour
2 tsp baking powder
1 cup milk
4 cups chopped rhubarb

Cream the butter for several minutes until pale yellow. While the machine is running, add the sugar slowly. Add the eggs, one at a time. Add the honey and rhubarb and mix. Scrape down the sides of the bowl and mix again. Add the flour and baking powder. Mix on medium for a minute or until just combined. Pour in the milk and mix until incorporated. The key is to not over-mix once you add the flour, which makes the final product tough.

Rhubarb is a wonderful plant that will live for years with little or no maintenance. It's a healthy food, providing anti-oxidants, minerals and lots of B vitamins, including niacin, which helps maintain the body's lipid levels. Once your rhubarb plant gets too big, you can pull it out and split it, as we did here:

This large plant became 7 new ones!
7 new plants from one giant root!
 Grow your own rhubarb and have fun inventing your own new recipes! Remember though: the leaves are toxic, so cut them off and toss them into your compost bin. Enjoy!